Quick Links
Anyone who has had the pleasure of listening to music on a vinyl record knows how wonderful the iconic medium sounds, but few actually know how records are made. Surprisingly, it's quite an intricate process---and an interesting one at that! Let's take a peek behind the curtain.
Those unfamiliar with the process might be surprised to learn all that goes into making a single vinyl record. On the other hand, serious vinyl enthusiasts know how critical each step is; every part of the process can significantly affect a record's quality. So here's a step-by-step look at how 12-inch LP records---the most common---are made.
Optimization and Preparation
Believe it or not, the roots of the record creation process take hold long before heading to a vinyl pressing facility. This process actually begins in the hands of the mastering engineer the band or artist is working with.
This sound engineer (or sometimes, a team of engineers) will take the digital studio recording files created by the musician and prepare them for transfer to vinyl. They will ensure that tracks are properly optimized for vinyl by running them through several steps, including ensuring that tonality and levels (and other high-level details) are consistent song-to-song.
Engineers also work with the musician and producer to determine an album's song cover, as each side of a record can only hold about 20-30 minutes' worth of audio. Together, the group will figure out the final order of the songs, evenly splitting them across the two sides of the record. This is all further complicated by the fact that sonic resolution is gradually diminished the closer to the center of the vinyl you get, affecting the sampling rate and overall fidelity.
The mastering process is one that's incredibly complex---so much so that we don't have nearly enough time or space to dive into it here and do it justice---but it can make or break a record long before it debuts on your favorite streaming music service or becomes a vinyl record. So much has to line up just right before an artist's music ever makes it to the vinyl press. Speaking of which ...
Creating the Master Disc
After the digital files are prepared, the next step is to get them onto the Master Disc, also called the Lacquer Master. As you've likely assumed from the name, this is the primary disc all of the individual copies will be made from.

Master discs have aluminum cores that are sanded down to be as smooth as possible; this process also gets rid of dust, scratches, and anything else that might impact the record's sound. This process is absolutely critical when it comes to creating a high-quality record.
From there, the aluminum is covered in a thick coat of nitrocellulose lacquer, left to dry, then put through a rigorous inspection. Any excess nitro lacquer will be removed and reused later. If a lacquer master fails (which isn't uncommon), it's back to square one until a viable master is produced. Once a master is approved, however, the engineer then punches a hole in the center and packs it onto a spindle along with any requested duplicates for backup, each separated by protective strips.
Imprinting Music Onto the Master Disc
Now it's time for the cool part---imprinting the music onto the master disc! First, the disc is placed on the cutting lathe; you'll typically also see a sapphire-tipped carving stylus (or one made with a comparable material, like diamond) in this setup, as well as a microscope and a vacuum stick. Next, the engineer does a test cut at the edge and inspects it for flaws with the microscope.
If everything looks good, the actual continual-groove recording is then imprinted, starting with the outer edge and working toward the record's center. Remember those digital files the mastering engineer worked so hard on? Yep, those digital files are sent to the cutting lathe, which, in turn, converts the sound waves in real-time into vibrations that the lathe carves into the master disc's grooves.
The entire process is (obviously) closely monitored by a cutting engineer who will also manually create the spaces in between each of the songs on the album. The master disc then goes through another round of inspections and must pass before moving on to the next step.
Creating the Stamper
We're not off to creating the individual pressings yet---there's still one more disc that needs to be created. This disc, called the stamper, is made from the master disc and the one that'll be used to stamp the grooves onto the vinyl copies we buy in stores. Depending on how many copies are ordered, multiple stamper records may need to be created, as they wear down over time; typically, one stamper disc is used for every thousand records produced.
Unsurprisingly, the process for creating stamper discs is just as complex as it is for creating the lacquer master, if not moreso. Once the master disc has the music files imprinted onto it, it's washed to remove any new debris, sprayed with liquid silver, washed again to remove excess silver, then sprayed with tin chloride.

From there, the master enters the electroforming process (also called electroplating), in which it is submerged in a nickel bath. This part is key, as the nickel creeps into every groove on either side of the disc and bonds to it by an electrical charge. The nickel siding is then removed, and you're left with two discs---the master disc and the newly-formed electroplated disc, called the "Father" disc. What's noteworthy is that the Father disc sports upward ridges instead of the carved grooves of the master---this is the disc "template" that'll be used to stamp that particular album's copies.
The electroplating process is then repeated, this time with the Father disc, to create a "Mother" disc, which has grooves just like the lacquer master does. Mother discs are used to create the stamper discs, which are what's used to create individual vinyl records, aka the final product. Of course, final stampers get the center hole punch for processing and have excess material trimmed off before they officially hit the press.
Naturally, both Father and Mother discs undergo quality inspections, and additional stampers can be created from the Mother disc as needed. This three-step process is typical for larger runs. If it's for a small release, however, this process is often reduced to just one step, wherein a stamper is made directly from the master. This stamper is usually only good for a few hundred records.
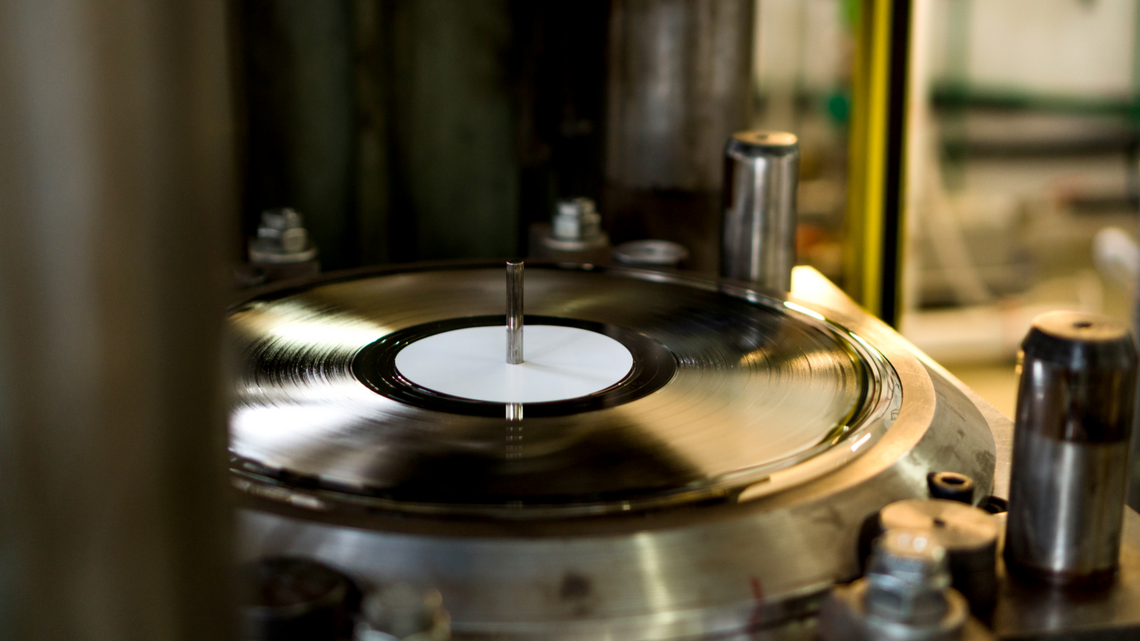
Pressing the Actual Vinyl
With the stamper ready to go, it's time to bust out the vinyl ... literally. Individual records start off as polyvinyl chloride (PVC) pellets. These are transparent by default, but you can add colorant to create the traditional black vinyl records or a more unique and colorful pressing.
A portion of these vinyl pellets, which weighs about 160 grams (though it can range anywhere from 120-200 grams), gets melted at about 320 degrees Fahrenheit and squeezed into a blob, usually called a puck, cake, or biscuit. As a side note, there is some debate within the vinyl community over 180-gram pressings (often dubbed "audiophile-grade") and whether or not they are better than the "standard" 120-140 gram pressings, thanks to their heftier weight.
Once a vinyl puck is formed and sat on the hydraulic press, the stampers are then placed on either side of it, like two pieces of bread on a sandwich. Before the actual pressing happens, the album label is centered onto the puck. It's interesting to note that labels aren't actually glued onto the record after it's pressed---they're squished into the place by pressure. Furthermore, they are baked beforehand at about 250 degrees Fahrenheit to remove any moisture and prevent bubbling.

Then the pressing commences! The two stampers come together at about 2,000 PSI (that's about the level of pressure medium-duty pressure washers use for cleaning). Initially, the press reaches 300 degrees Fahrenheit, but then the vinyl is cooled to a mere 100 degrees. During this process, the stamper ridges push into the hot malleable vinyl to create the grooves; the label is also squashed into place here. After, a separate machine makes a quick pass to remove excess vinyl, often reused for future records.
Once cooled, the record is popped out and lands on a spindle. The pressing takes 30 seconds a pop and is hands-down the fastest part of the entire process.
Test Pressings & Quality Assurance
During each batch of pressings, a quality assurance check is performed. A few random albums are created and played by an employee---called test pressings---to ensure there aren't any significant problems and that everything sounds good. Test pressings also get shipped to the artist, producer, and music label for approval.
The approval process is different for every album and artist. Depending on the vinyl press company (and likely a slew of other circumstances), a digital copy of the randomly-selected albums can also be created and emailed to save some time, but this isn't ideal. Once everything is approved, the newly-created records are green-lit for mass production.

Packaging & Distribution
Here were are, at the final step in this incredible process! Pressed records are placed manually into their inner sleeves and outer album cover. This process doubles as yet another quality checkpoint and ensures that the final product isn't scratched, dropped, bent, or otherwise damaged before it gets to you.
Once in their cover, the records are sent through a shrink wrap machine, boxed up, and shipped to the music stores. Voila!
So Now That You Know ...
Now that we've explored the creation process---right from when the band or artist finishes recording and hands over the digital files to the mastering engineer to getting the final product packaged and ready for distribution---it's time for you to pick up some vinyl for your collection. We found plenty of online record stores with tons of selection, as well as a handful of cool vinyl subscription boxes that'll deliver new music to your doorstep each month.
If you're new to the wonderful world of vinyl like I am, you'll probably also want to purchase a beginner-friendly turntable and some over-ear headphones to get started with. If you've already started building a healthy vinyl collection, here's how to keep your records clean. The more you know, right?